

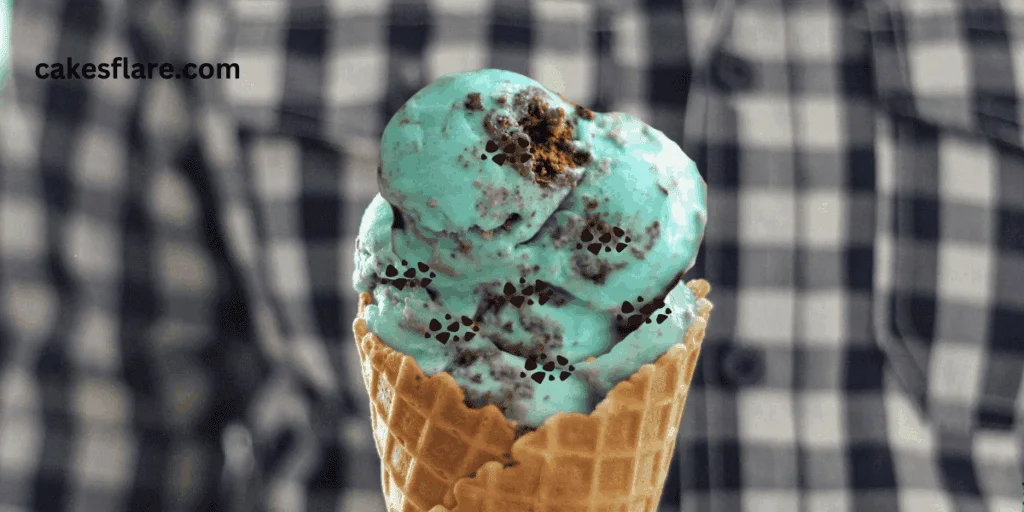
Monster Cookie Ice Cream: The Fun, Easy Treat Everyone Loves!
Monster Cookie Ice Cream has quickly become a staple in our home, and I’m so excited to share the recipe with you! The first time I made it was for a family get-together, and the reaction was priceless. The kids were amazed by the vibrant blue color, and the adults couldn’t stop talking about how it tasted like a mix of all their favorite treats in one. From that moment on, it became our go-to dessert for any celebration. The combination of creamy vanilla ice cream, crunchy chunks of Oreo and chocolate chip cookies, and a hint of peanut butter gives this dessert a playful, indulgent twist that’s hard to resist. Whether we’re celebrating birthdays, having a movie night, or just craving something sweet, this ice cream always hits the spot.
What makes this ice cream so special is that it’s both easy and customizable. No fancy ice cream maker is needed—just a few simple ingredients and a little patience. And the best part? You can adjust it to fit your taste. Want more cookies? Go for it! Prefer it to gluten-free? You’ve got it covered. Over the years, we’ve played around with different variations, and it’s always a hit. With the rich chocolate and oatmeal base mixed with all your favorite cookies, it’s a treat that will make any occasion feel extra special. It’s the kind of dessert that brings people together and makes any moment more fun.
What Makes Cookie Monster Ice Cream Special?
If you love a creamy, homemade treat, then this no-churn ice cream is for you! It’s unbelievably quick and easy to make, requiring just a few ingredients to create a rich, smooth texture. Unlike other frozen desserts that become too solid, this one stays soft and fun to eat. The base is packed with an incredible flavor, making each bite satisfying. Whether you’re making it with or without an ice cream machine, this alternative ensures a perfect scoop every time.
What truly sets this apart is the cookie madness inside! The generous amount of pieces makes every spoonful a delightful surprise. It’s not just a treat—it’s a frozen dessert experience meant to be shared. With the right ratio of mix-ins, each bite balances sweetness and crunch perfectly. Whether served in cones, on a hot day or as part of a kid-friendly sundae bar, this is the ultimate indulgence for every sweet tooth.
Why You’re Going to Love This Cookie Monster Ice Cream
- Incredibly Creamy & Crunchy – The perfect mix of sweet cream, vanilla base, and cookie dough batter-flavored swirls makes each bite rich and indulgent while the chunks of Oreos and chocolate chip cookies add a satisfying crunchy texture.
- No-Churn & Easy to Make – You don’t need an ice cream maker to whip up this simple, homemade treat. Just a few ingredients and some patience, and you’ll have a delicious, creamy dessert.
- Completely Customizable – Add your favorite mix-ins like peanut butter cookies, extra cookie pieces, or even colorful sprinkles to make it uniquely yours.
- Perfect for Any Occasion – Whether it’s a birthday, a cozy night in, or a summer gathering, this ice cream is a crowd-pleaser that everyone will love.
- Fun & Colorful Appearance – The bold blue color makes it a standout dessert, bringing a touch of childhood nostalgia to every scoop.
- Great for Cookie Lovers – If you love cookies in all forms, this ice cream is the perfect balance of your favorite flavors in one creamy, frozen treat.
- A Whimsical & Playful Treat – The fun appearance and vibrant color make this ice cream feel like a special indulgence that’s exciting to eat.
- Homemade Goodness Without the Hassle – Unlike store-bought options, you can enjoy the freshness of homemade ice cream, knowing exactly what goes into it.

Ingredients You’ll Need:
- 2 cups heavy whipping cream (cold)
- 1 can (14 oz) sweetened condensed milk
- 1 tsp vanilla extract
- Blue gel food coloring (adjust for desired color)
- 1 cup Oreo cookies (chopped into small pieces)
- 1 cup chocolate chip cookies (chopped into small pieces)
- ½ cup peanut butter cookies (optional, for extra flavor)
- ½ cup mini white chocolate chips (optional)
Step 1: Soften the Ice Cream Base:
- Let the vanilla ice cream (if using store-bought) sit at room temperature for 5-10 minutes to soften slightly.
- If making from scratch, start by whipping the cream in a large mixing bowl using a hand mixer or stand mixer on high speed until stiff peaks form (about 3–4 minutes). Be careful not to over-whip the cream.
Step 2: Add the Color:
- In a separate bowl, mix the sweetened condensed milk, vanilla extract, and a few drops of blue gel food coloring. Stir well until the color is evenly mixed and uniformly blue.
- Gently fold in about 1 cup of the whipped cream into the blue mixture to lighten it.
- Pour the blue mixture back into the remaining whipped cream and carefully fold everything together until fully combined.
Step 3: Chop the Cookies:
- Take your Oreo cookies and chocolate chip cookies and chop them into small pieces using a knife, or food processor, or by placing them in a sealable bag and crushing them with a rolling pin.
- If using peanut butter cookies or mini white chocolate chips, chop and set them aside.
Step 4: Mix in the Cookies:
- Gently fold the chopped cookies into the blue ice cream mixture, ensuring an even distribution without deflating the whipped mixture.
Step 5: Freeze the Ice Cream:
- Pour the ice cream mixture into a loaf pan or freezer-safe container.
- Smooth out the top using a spatula and cover tightly with plastic wrap or a lid to prevent ice crystals from forming.
- Freeze for at least 6 hours or overnight until the ice cream is firm enough to scoop.
Step 6: Serve and Enjoy!
- Once the Monster Cookie Ice Cream is frozen, scoop it into bowls or cones.
- For extra crunch and decoration, top with additional cookie pieces or a drizzle of chocolate.
- Serve and enjoy this fun and colorful treat with family and friends!
Tips for Success – Making the Best Monster Cookie Ice Cream
- Whip the Cream Just Right:
Be sure to whip the cream until stiff peaks form, but don’t overdo it! Overwhipping can make the texture too dense, and you want that light, airy consistency. The goal is to make it thick but still soft enough for easy folding. - Use Cold Heavy Cream:
Cold cream will whip up better and give you that smooth, creamy texture. So make sure to chill your heavy cream before you start the process! - Customize Your Colors:
If you want to get creative, feel free to adjust the color. You can add more food coloring to make it a deeper blue or mix in other fun colors to match your event (think pastel shades for spring parties!). - Perfect Your Cookie Mix-ins:
Don’t crush your cookies too finely; you want to keep some chunks for that delightful crunch! The mix-ins should be big enough to create a nice bite but not so big that they overpower the ice cream base. - Freeze Properly:
To prevent ice crystals from forming and keep your ice cream silky smooth, be sure to cover the surface of your ice cream with plastic wrap or a tight lid before freezing. You want to trap all that creamy goodness inside! - Let It Sit Before Scooping:
After it’s fully frozen, let the ice cream sit at room temperature for a few minutes. This makes scooping much easier and avoids the struggle of using a spoon that’s too hard to get through. - Get Creative with Toppings and Add-ins:
Experiment with extra toppings like crushed pretzels, mini marshmallows, or even colorful sprinkles! You can also layer in some peanut butter chips, marshmallow fluff, or even brownie chunks for a fun twist.
Best Way to Store Monster Cookie Ice Cream
- Transfer ice cream into an airtight container to prevent freezer burn and preserve its flavor.
- Use plastic wrap or an additional barrier like foil to block air exposure and keep it creamy.
- Keep it in the coldest part of the freezer, ideally at 0°F, to maintain its consistency.
- Avoid frequent opening of the freezer door to prevent temperature fluctuations.
- Portioning into smaller containers helps with easy scooping and prevents repeated melting.
- Label each batch with the date to track its shelf life and ensure it’s consumed within 1-2 months.
- Rapid freezing after churning helps prevent large ice crystals from forming, keeping the texture smooth.
- Avoid using cardboard or thin plastic containers, as they can absorb unwanted odors.
- A secure lid is essential to prevent air exposure and keep the dessert fresh for a longer time.
- These small practices help in maintaining the rich texture and delicious taste of Monster Cookie Ice Cream.
Tasty Additions for the Ultimate Treat
- Crunchy Cookie Mix-ins – Add chocolate chip cookie pieces and Oreo Cookies for a satisfying crunch in every bite.
- Mini Cookies for Extra Texture – Toss in mini cookies to create a fun bite-sized experience in each spoonful.
- Rich and Creamy Swirls – Mix in marshmallow fluff to make the ice cream even creamier and extra smooth.
- Decadent Drizzles – Enhance the sweetness with hot fudge and caramel sauce for a rich, indulgent touch.
- Nutty Flavor Boost – Stir in peanut butter chips or drizzle some peanut butter sauce for added depth and richness.
- Perfect Chocolate Balance – Use both white chocolate chips and dark chocolate chips to balance the flavors.
- Chewy and Soft Add-ins – Add mini marshmallows, coconut flakes, or chopped nuts like almonds and pecans for variety in texture.
- Colorful and Fun Mix-ins – Toss in M&Ms or other candy mix-ins for pops of color and extra crunch.
- Salty-Sweet Contrast – Crush pretzels into the mix to create a caramel-like crunch that balances the sweetness.
- Fruity Twist for Extra Flavor – Mix in raisins or cranberries to add a natural sweetness to the ice cream.
- No Churn Simplicity – This extra creamy, classic, delicious Monster Cookie Ice Cream is easy to make—just mix, freeze, and enjoy!

Variation of Monster Cookies
One of the best things about Monster Cookie Ice Cream is how customizable it is! You can turn this delicious treat into something even more exciting by adding fun and tasty mix-ins. For a chewy texture, mix in chunks of edible cookie dough, which gives a rich cookie flavor that reminds you of eating raw cookie dough straight from the bowl! If you’re a chocolate lover, adding small pieces of brownie creates a fudgy chocolate swirl that pairs perfectly with creamy ice cream. For a visually stunning dessert, try layering Cookie Monster Ice Cream with whipped cream and chocolate syrup in a tall glass to make a layered milkshake that’s as gorgeous as it is delicious.
But the creativity doesn’t stop there. You can make mini ice cream cakes by using cupcake liners, layering small rounds of cake with Cookie Monster Ice Cream, and frosting them for a perfect single-serving dessert. Or, take your ice cream to the next level by creating ice cream sandwiches. Just place the ice cream between Oreos or chocolate chip cookies, and for extra fun, roll the edges in crushed cookies or dip them in melted chocolate. A cookie crust layer at the bottom of an ice cream cake, made from chocolate cookies and melted butter, adds the perfect crunchy base. Want something a little different? Try a multi-flavored experience by layering mint chocolate chip or cookie dough ice cream. Top everything off with caramel sauce, chopped nuts, or sprinkles to make it extra fun and delicious.
Final Thoughts
Monster Cookie Ice Cream is the ultimate dessert for any occasion, offering endless opportunities to experiment and create your personalized version. Whether you add chocolate chip cookie dough, a fudgy brownie swirl, or top it with your favorite sprinkles, it’s a treat that’s sure to please. Don’t be afraid to mix up flavors, layer them in milkshakes, or even turn your ice cream into mini cakes or ice cream sandwiches. The possibilities are endless, and with each bite, you can enjoy the rich, creamy texture and crunchy goodness. It’s a fun, colorful treat that everyone will love!
FAQs
1. Can I make Monster Cookie Ice Cream without an ice cream maker?
Yes! You can make a no-churn version by whipping heavy cream and mixing it with sweetened condensed milk, then adding your favorite mix-ins before freezing. It’s simple and delicious!
2. What’s the best way to store homemade ice cream?
To store your Monster Cookie Ice Cream, transfer it into an airtight container and place it in the coldest part of the freezer. Cover the surface with plastic wrap to prevent ice crystals and ensure the ice cream stays fresh and smooth.
3. How long does homemade Monster Cookie Ice Cream last?
It’s best enjoyed within 1-2 months for the freshest flavor and texture. Be sure to store it properly to avoid ice crystals forming, but it can last longer if needed.
4. What toppings go well with Monster Cookie Ice Cream?
You can add chocolate syrup, caramel sauce, crushed cookies, whipped cream, chopped nuts, or sprinkles for extra texture and flavor. These toppings will make your ice cream even more enjoyable!
5. Can I add different mix-ins to change the flavor?
Absolutely! You can mix in M&Ms, peanut butter chips, marshmallow fluff, coconut flakes, or even dried fruit to create new, exciting variations of the ice cream. Feel free to get creative with your favorites!
6. How do I make Monster Cookie Ice Cream into an ice cream cake?
Layer the Cookie Monster Ice Cream in a cake pan with a cookie crust base made from chocolate cookies and melted butter. Freeze until firm, then top with whipped cream or chocolate drizzle for a fun, festive treat.
Tips for Success
- Whip the cream just until stiff peaks form to ensure a smooth and creamy texture.
- Use an airtight container to prevent freezer burn and maintain the texture.
- Add marshmallow fluff or peanut butter chips for extra flavor and creaminess.
- Layer your ice cream in a milkshake or sandwich for added excitement.
Ultimate Monster Cookie Ice Cream Recipe
Equipment
- Mixing bowls
- Hand mixer or stand mixer
- Loaf pan or freezer-safe container
- Spatula
Ingredients:
- 2 cups (22 oz) heavy whipping cream, cold
- 14 oz can of sweetened condensed milk
- 1 cup (3 oz) marshmallow fluff
- 2 tsp vanilla bean paste (or vanilla extract)
- Pinch of salt
- 1/4-1/2 tsp blue gel food coloring
- 10-12 cookies, roughly chopped (mix of Oreos, Chips Ahoy, and monster cookies)
- 1 tbsp vanilla extract
- 1/2 tsp blue gel food coloring (optional for a more intense color)
- 20 Oreos, chopped
- 15 Chips Ahoy cookies, chopped
- 1/2 cup peanut butter sauce (optional)
- 12 monster cookies, roughly chopped (about 2 ½ cups)
- 1¾ cups heavy cream
- 1¼ cups milk
- ¾ cups granulated sugar
- 1/6 tsp kosher salt
- Chocolate fudge sauce (for swirling)
- Crushed pretzels (optional, for crunch)
- Whipped cream, sprinkles, and chopped nuts (optional, for topping)
Instructions:
- Whip the Cream:
- In a large mixing bowl, use an electric mixer with the whisk attachment to beat the cold heavy whipping cream until it forms stiff peaks. This should take about 3-4 minutes at medium-high speed.
- Add Condensed Milk and Marshmallow Fluff:
- Add the sweetened condensed milk, marshmallow fluff, vanilla extract, and a pinch of salt to the whipped cream. Beat the mixture gently until everything is well combined.
- Add Food Coloring:
- Gradually add the blue gel food coloring and mix until the ice cream base reaches your desired shade of blue. Add more food coloring to intensify the color if you prefer.
- Add Fudge Swirl (Optional):
- Gently fold in a few spoonfuls of chocolate fudge sauce to create a marbled effect in the ice cream.
- Fold in the Cookies:
- Fold in the chopped cookies (Oreos, Chips Ahoy, and Monster cookies). Optionally, you can add crushed pretzels for extra crunch, mixing them into the batter.
- Freeze the Mixture:
- Transfer the mixture to a freezer-safe container, layering in extra chopped cookies and peanut butter sauce (if desired) between the layers. Cover with a lid or plastic wrap and freeze for at least 6-8 hours or overnight, until it firms up.
- Serve and Enjoy:
- Once the ice cream is firm, scoop it into bowls or cones. Top with whipped cream, sprinkles, and chopped nuts for extra texture and fun! You can even drizzle more peanut butter sauce over the top for an indulgent finish.
Tips & Suggestions:
- Gel Food Coloring: For a more vibrant, concentrated color, stick with gel food coloring instead of liquid coloring to avoid affecting the texture.
- Customize the Cookies: Use a variety of cookies like Peanut Butter Cups, Snickers, or even brownie bites for a fun twist.
- Fudge or Caramel Swirl: For a richer taste, swirl some chocolate fudge sauce or caramel into the ice cream before freezing it.
- Ice Cream Sandwiches: Make mini ice cream sandwiches by placing a scoop of this delicious ice cream between two cookies or waffles.
- Storage: Store the ice cream in a tightly sealed container in the freezer for up to two weeks.
Notes:
- Make Ahead: If you’re making this ice cream in advance, you can prepare the ice cream base the night before and freeze it overnight for best results. This allows the flavors to meld and makes the churning process easier.
- No Ice Cream Maker?: No worries! If you don’t have an ice cream maker, you can pour the mixture into a container, cover it, and freeze it. Be sure to stir it every 30 minutes during the first few hours to break up any ice crystals and make it creamy.
- Customization: This recipe is versatile! Feel free to switch up the cookies and mix-ins to match your preferences. You can use graham crackers, chocolate chunks, or even mini marshmallows for fun variations.
- Creamy Texture Tip: For a smoother and creamier texture, make sure the heavy cream is cold when whipping, and always check the consistency before freezing. If it’s too runny, chilling it in the fridge for 30 minutes can help.
- Serving Suggestion: For an even more indulgent treat, serve the ice cream on top of a warm brownie or in a freshly baked waffle cone!

One Response